Connecting to relational databases (MySQL, PostgreSQL)
Learn how to connect Node.js to a PostgreSQL database and fetch data in this tutorial.
Lets Go!
Connecting to relational databases (MySQL, PostgreSQL)
Lesson 19
Understand how to connect a Node.js application to relational databases such as MySQL and PostgreSQL using native drivers or libraries.
Get Started 🍁Introduction to MySQL, PostgreSQL
Welcome to "Introduction to MySQL, PostgreSQL"! In this course, we will explore the fundamental concepts and techniques related to connecting Node.js to PostgreSQL.
Have you ever wondered how to seamlessly integrate Node.js with a PostgreSQL database and retrieve and display data on the console? If so, this course is perfect for you.
Throughout this course, we will cover essential setup steps, such as initializing a client, installing the pg package, specifying connection parameters, and writing queries to interact with the database. By the end of the course, you will have a solid foundation in connecting Node.js to PostgreSQL and manipulating data effectively.
Join me, Kindson, the tech pro, as we embark on this exciting journey together. Don't forget to subscribe and reach out if you encounter any challenges. Let's dive in and explore the world of Node.js and PostgreSQL integration. Get ready to elevate your skills and unlock new possibilities in the realm of database management.
Let's get started!
Main Concepts of Connecting Node.js to PostgreSQL
-
Initial Setup
- To connect Node.js to PostgreSQL, you first need to initialize your project by running
npm init -y. - Next, you need to install the
pgpackage by runningnpm install pg.
- To connect Node.js to PostgreSQL, you first need to initialize your project by running
-
Creating a Client
- To establish a connection with PostgreSQL, you need to import the client by requiring
pg. - Specify the connection parameters such as host, user, port, password, and database name.
- To establish a connection with PostgreSQL, you need to import the client by requiring
-
Connecting to PostgreSQL
- Once the client is created, use
client.connect()to establish a connection with the PostgreSQL database.
- Once the client is created, use
-
Executing Queries
- Use
client.query()to execute SQL queries. For example,SELECT * FROM users. - The
client.query()method takes in two parameters: the query string and a callback function for error handling and result retrieval.
- Use
-
Error Handling
- Implement logic to handle errors when executing queries. If an error occurs, log the error message.
- If no error occurs, print out the query results using
res.rows.
-
Closing the Connection
- After executing queries, remember to close the connection with
client.end().
- After executing queries, remember to close the connection with
-
Testing the Connection
- Execute the Node.js file (in this case,
database.pg.js) to test the connection and query execution. - Verify that the data retrieved from PostgreSQL is displayed correctly on the console.
- Execute the Node.js file (in this case,
This tutorial provides a step-by-step guide on how to connect Node.js to PostgreSQL, execute queries, handle errors, and close the connection properly. By following these concepts, you can effectively integrate Node.js with a PostgreSQL database for data retrieval and manipulation.
Practical Applications of Connecting Node.js to PostgreSQL
In this section, we will guide you through the process of connecting Node.js to PostgreSQL to fetch and display data.
-
Initialize and Install Packages:
- Open your terminal and navigate to your project directory.
- Create a new file called
database_pg.js. - Run
npm init -yto initialize the project. - Install the
pgpackage by runningnpm install pg.
-
Create a Client and Connection:
- In
database_pg.js, require thepgclient by adding this line:const { Client } = require('pg'); - Specify the connection parameters:
const client = new Client({
    user: 'postgres',
    host: 'localhost',
    database: 'postgres',
    password: 'root user',
    port: 5432
});
- In
-
Connect to PostgreSQL:
- Connect to the client by adding the following line:
client.connect();
- Connect to the client by adding the following line:
-
Write and Execute Query:
- Write your query using backticks and execute it:
client.query('SELECT * FROM users', (error, results) => {
    if (error) {
        console.error(error);
    } else {
        console.log(results.rows);
    }
    client.end();
});
- Write your query using backticks and execute it:
-
Run the Code:
- Save your changes in
database_pg.js. - Clear the terminal screen.
- Run the script by executing
node database_pg.js.
- Save your changes in
-
Verify Data Retrieval:
- Check the terminal output to see the fetched data from the users table in your PostgreSQL database.
-
Further Exploration:
- Experiment with inserting, updating, and deleting data using Node.js and PostgreSQL.
Try out the steps above to connect Node.js to PostgreSQL and fetch data. Feel free to tweak the code and explore various functionalities. Happy coding! Remember to subscribe for more tutorials and reach out if you encounter any challenges. We're here to assist you on your coding journey!
Test your Knowledge
Which package is commonly used to connect Node.js with MySQL?
Advanced Insights into Connecting Node.js to PostgreSQL
In the previous tutorial, we learned how to connect Node.js to a MySQL database. Now, let's delve deeper into connecting Node.js to PostgreSQL for fetching and displaying data.
Setting up PostgreSQL Connection
To begin, create a new file named database_pg.js. Start by initializing your project using npm init -y, and then install the pg package with npm install pg.
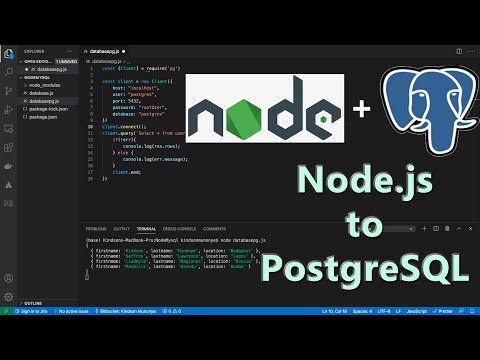
const { Client } = require('pg');

const client = new Client({
    host: 'localhost',
    user: 'postgres',
    port: 5432,
    password: 'root',
    database: 'postgres'
});

client.connect();

client.query(`SELECT * FROM users`, (error, results) => {
    if (error) {
        console.log(error);
    } else {
        console.log(results.rows);
    }
});

client.end();
Deeper Understanding
1. Error Handling
- Ensure to handle errors properly using
if-elsestatements to display relevant messages. - Be mindful of potential errors that may arise in querying data from PostgreSQL.
2. Clean-up
- Properly closing the client connection with
client.end()is vital to prevent memory leaks. - Be cautious and consistent with cleaning up resources to maintain the integrity of your Node.js application.
Curiosity Question:
How can you optimize database queries in Node.js to enhance performance and efficiency?
By mastering the intricacies of connecting Node.js to PostgreSQL, you are poised to expand your backend development skills and create robust applications. Stay tuned for more tutorials on data manipulation and advanced concepts in Node.js development. If you encounter any challenges along the way, don't hesitate to reach out.
Additional Resources for Connecting Node.js to PostgreSQL
- Node.js PostgreSQL tutorial: A comprehensive tutorial on connecting Node.js to PostgreSQL databases.
- PostgreSQL documentation: Official documentation from PostgreSQL for in-depth information and guidance on using PostgreSQL.
- Node.js PostgreSQL module: Official website for the
pgmodule, providing detailed instructions and examples for integrating Node.js with PostgreSQL. - Node.js and PostgreSQL integration: An article demonstrating how to create a RESTful API using Node.js, Express, and PostgreSQL.
Explore these resources to enhance your understanding of connecting Node.js to PostgreSQL databases.
Practice
Task: Install the MySQL or PostgreSQL Node.js library (e.g., mysql2 or pg) and write a simple script to connect and query a database.